Posts

Launch Day

Image
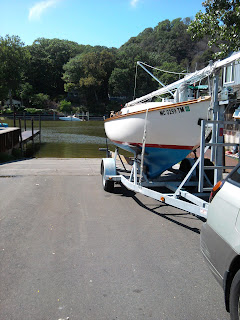
This was our first time launching the Typhoon off a trailer. BB and I had launched my old Catalina 22 off a trailer before but we figured this was a bit different the dory being a full keel boat.  I talked to a John at Tower Marine about the best places to launch in Saugatuck. He recommended launching at the  down town ramp next to The Star of Saugatuck .  The Star is a large paddle wheel river boat that cruises up and down Lake Kalamzoo and out to Lake Michigan.  When I went in to pay the ramp fee I asked the ladies at the counter about the ramp and water depth.  The drought this year was foremost on my mind and water levels are down here.  They said they didn't really know and in all their time working their had never seen a sailboat launch from the ramp.  So I paid the fee trusting John's knowledge of the area and we checked the ramp out more closely.  The launch went really well. So here are the basic stages we went through for those of you new to launching a sailboat at a

Rainy Day Project and Bronze Ports.

Image
The drought here has finally broken.  We've had several days or rain and there is just not much that can get done on the boat at this point.  So I pulled the tiller back off and brought it in for the day.  After several different wrap attempts I finally settled on this.  It really looks neat and the double braid line color goes really well with the new anti-skid.  The pictures really don't do this justice.  One of these days I'm going to get a better camera...  "I'll have to quit buying boat parts."   Yeah I'm probably never getting a better camera.  top side close up head on Bronze port Hillbilly Bronzing:  I looked at bronze ports at over a $100 a piece they are a bit down the road with regard to this project.  However Rustoleum metallic  paint is $22 dollars so this seems like a good option.    "Maybe I will get that camera after all."  Tape it off sand the old chrome spray it, easy peasy.  These where originally

Teak, Bronze, and Anti-Skid

Image
Rub Rails Sand, sand & sand some more.  This has been the summer of sandpaper for me.  The teak on this boat was in rough shape to say the least.  It had gone gray and the previous owner coated it with Watco teak oil obviously an attempt to pretty up the boat before selling.  So I stripped the teak with teak cleaner.  Then began sanding.  When I started this stuff was rough especially the rub rails.  I could easily see getting splinters in your foot as I walked around the deck or sat in the cockpit.   It took me a long time and a lot of deliberating on what to coat the teak with once I'd finished.  I was going to use Sikkens .   I've used Sikkens before however have not been overly thrilled with the products durability or mustardy color.  Yet all the web forums still say it is the best stuff out there.   While standing in the aisle at Wolfs   holding the can in my hand and looking around rather sad about the color choices one of Wolf's people came up and ask

Rigging, and bottom finish.

Image
Rigging projects.  What is that?  No.. no electrical tape is not the same as rigging tape.  Oh boy I think we will just make a new fore stay.   Boot Strip. I used  what was left of the top of my existing boot strip and projected down .  Similar to this video from sailing  Magazine.  My boot strip might be a bit wider that the original but I figure it is easier to paint the blue up a little higher than trying to apply red over the anti-fouling paint later.  Hopefully every thing will lay correctly we will see once it is in the water.   Bottom paint. With all of the reading I've done it seems their is a push to remove copper from bottom paints.   So I decided to take the leap and go with Pettit Paints Ultima Eco, Copper Free Dual-Biocide.  According to the guys at Wolfs Marine  it is a new product this year but the testing on it has been  shown  to have good results.  It took about half a gallon to put 3 coats on the bottom.  It looks pretty good.  Sittin

Stripping the bottom of a CD Typhoon

Image
At the start I think there may have been 35 years worth of paint on the bottom of this boat minus what had chipped off.   I knew this was going to be a big job at the beginning but thought maybe I'd get lucky and most of it would just power wash off and a lot did.  It ended up being a 3 stage process.  Power wash, Chemical Strip then ultimately grind/sand off  the remaining paint.  Stage 1.  Power washing let's see what we have here.  A good power wash also identified some problem areas around the rudder gudgeon, and shaft. That can't be good. Well there is still some fiber glass holding the rudder on. Inspector is up from his nap...  Dad things are not looking good here. Stage 2 Paint Stripper.   For this I used Back to Nature Ready Strip .  Found at your friendly West Marine.  The reviews on West's web site are pretty accurate.  The stripper is not a cure all but given time it takes off quite a bit.  I stripped t