Posts

Showing posts from 2013

September sailing video with editing & music! We're big time now.

Image
Here we go my first ever edited video.  Watch out J.J. Abrams here I come.  Ha Ha.  I have a bit more practicing to do.   For the record Myles is not a land lover but it just fit with the music so well I had to post it.  He's been on boats with us since he was just a few weeks old. Here's an old shot of him up on the shelf of the last boat. 

Some bad video

Image
It's winter not much going on here on a Sunday night.  I was looking through some of my old videos.  Not good ones but hey they are of the Typhoon so here is something for the blog. Typhoon at sea level.  Really bad videos:  Get ready to get sea sick from the shaking camera.    Got your Dramamine,  sea bands and ginger cookies go ahead push play.

Tiller cover

Image
  Last spring I took my first attempt at making a tiller cover for my Typhoon, but it ended up being to tight.  Then our basement flooded ruining this prototype.  My spring attempt was basically a giant tube sock.  It was a massive pain pulling the end back through on itself.  "Sunbrella is stiff stuff"   and when it didn't fit.  I had a few choice words.    So I just blew it off for the season and went sailing.   Well the summer sun is harsh and I want my varnish to last a bit longer so I decided to give it another go.  This time I plan to take the guess work out of it and make a tiller cover that is adjustable.  Similar to the one I had on my last boat  Shenanigans .   Making it adjustable will solve many of the challenges one faces with a Typhoon tiller.  The first challenge the arc.  These tillers have quite a bend in them as they come up from the sole of the cockpit floor. This arc makes it more difficult to get the fabric to lay and look correct. and ultim

Frosty morning. First Snow.

Image
Our First snow came last night.  The weather man was calling for it.  We didn't believe them.  We've had snow here in October before but never this early.  I suspect we are going to get a lot of snow this winter.

Don't waste the wind.

Image
We're waiting for ice boating season to begin and word is we may get our first snow tonight.  I kinda of doubt it but the weather man is calling for a chance.  Any ways no point in missing out on a good breeze.  We headed down to the beach stunt kites in the trunk.     First we set up.  Then we fly.   Soaring Beach exploration team.       

DN Season

Image
With summer season coming to an end here in the North it is time to focus on the other boating season.   ICE BOATING!    This weekend I pulled down my new DN hull and got the second coat of paint on it.  I picked up an incomplete hull last year at the Gull Lake Ice Yacht Club  swap meet to replace my old hull.  I managed to get all the rigging moved over and the 1st coat of paint on before last season, but never got the time to get a second coat of paint on it or get it out on the ice.  After the second coat the blue paint gleams as you can see the reflections of the ceiling in the pictures below.   I can't get over just how much sleeker this new hull is than my old one.  It makes me think perhaps I need to update the rig that goes on top off it.  Well maybe at this years swap meet.    Is it time for winter to start?   I"m not a big fan of these intermediary seasons.  I could skip Thanksgiving.       Now everyone  ......... " Think ICE! "...........   It's time f

Closing up in the Rain

Image
It was a wet wet weekend here.  It rained all Saturday and Sunday.  Regardless I felt I needed to get the cover on.  The leaves here are beginning to fall at and accelerated rate.  I don't want them all over the deck and plugging the scuppers up so out in the rain I go.  Step 1 Ribbing  I use PVC pipe's to create a rib cage on the mast.  Here on the west coast of Lake Michigan we have been know to wake up to 4+ ft of snow, so the ribbing helps keep the snow from crushing down onto the deck.  While not a perfect system it helps.  Step 2 cover with plastic.  I like the clear plastic you find in the paint section of most big box hardware stores $14.00   Step 3  Bunch up the plastic in a ball and tie it down to the trailer.  The final product a tented boat prepped for winter. 

2013 Season Ender

Image
Last trip out The season ender this weekend was delayed by one day.  We had planned to sail our last day of the season Saturday with some friends however the wind was blowing 20-25 knots.  With 2 little kids we thought it would be a bit much to take new sailing friends out on the lake.   All ended well though we made it out Sunday afternoon for one final round on the lake. Photo of boom reef  The wind was still blowing a pretty gusty 12-15 knots today so we stared with a reef in the main.  We are just out to relax.  I have on my  sailrite  main right now and it has reef points built in.  However I have not run the lines so I just roller reefed it in with the boom.  I really think the roller reefing is one of the most convenient features on this boat.  It is a bit of a pain to have to pull the topping lift off to turn the boom but really not that big of a deal.  Next season I'm going will splice in an extra clip to the topping lift line.  This clip will be used on

Sailing with a 4 year old.

Image
Around a year ago I published a post about sailing alone with a three year old.  Today I thought hey he's a whole year older.  Sailing alone with a four year old is different than a three year old.  Sure three and four year old's both want to help and be engaged.    However the four year old is far more capable of "helping out" on the Typhoon.  This can be good, it can also be bad. Four year old's remember stuff.  They know where you put those sail ties and can retrieve them for you. Four year old's remember stuff and will tell on you . Four year old's are stronger so when it comes to light wind days they can actually trim the jib.  "Maybe next year we will learn to tie off cleats." Four year old's are stronger so they can break things more readily. Four year old's can help rinse the deck with a hose when you are cleaning. Four year old's have their own ideas about how clean the boat should be, and may fill yo

Spinnaker Blocks

Image
I bit the bullet here and decided it was time to suck it in and climb my way to the back of the Typhoon.  This has been some time in the planning but just hasn't happened until today.  I've been using my Genoa blocks for my Spinnakers for sometime now. With the new full mast length spinnaker the time has come to set up some proper blocks at the stern of the boat.   Into the black abyss Sky light. Thru bolts In the following picture you can see the difference this will make.  When I'm heading up I can get a lot more out of the kite turning 10-12 degrees higher. Genoa, Spinnaker blocks  For my final set up I plundered the blocks and stand up springs off my ice boat. The mount is through the taft rail one bolt and the rear is actually a screw.  I was a bit worried a bolt on the aft might puncture the hull.  I can tie off the sheet lines at the rear dock cleats or run my line backup into the cockpit. Final set up 

Varnish Wooah's

Image
It's been a while since I've posted.  Oh well, I've been busy sailing.  I finally stopped long enough to do the maintenance coat on the varnish.  My wife got home from work and I made a B-line for the door.  I spent a warm warm summer evening scuffing and coating the varnish.  I thought I'd done a pretty decent job with the exception of one location where I knew I had a run but couldn't get it to work out.  I figured I'd scuff it out in a few days and touch up the area. Cape Dory Typhoon at sun set. Now the problem.  I ended up with a heavy dew setting in that night.  The result was a a glazed effect on all of the teak I'd done the night before.   Glazed teak from early dew. I was less than thrilled.  After a couple of days of grousing about it, I headed down again.  This time on a warm/hot morning.  I ended up scuffing up all the teak with some 220 sand paper and then going over it again with a fine 3M scuff pad.  It was at this point I was thi

Cape Dory Typhoon Masthead spinnaker fitting

Image
Masthead Spinnaker Fitting on " Kraken ".  Cape Dory Typhoon.  Cape Dory Typhoon Spinnaker Fitting. Cape Dory Typhoon Cape Dory Typhoon Spinnaker Set up.

A removable compression post

Image
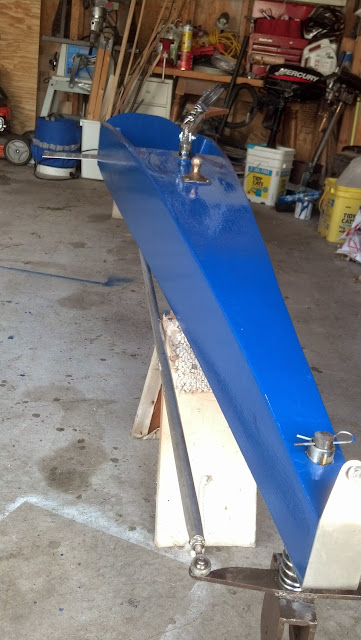
So this season I have been gearing up and changing my rigging around bit by bit as I find pieces here and there.  My ultimate goal is to  rig up a mast top spinnaker for use later in the season.  So far, I've got the mast head halyard set up.  Today I took the next step and installed a removable compression post.  My Typhoon has the saddle supports that came with older Cape Dorys but I thought it best to add a bit of extra support before trying out the mast head spinnaker. So here is what you will need:  A nice piece of teak, two other (less nice) hardwood boards for underneath the floor cut to 4 1/2 inches,  epoxy, 3M permanent mounting tape and a master lock adjustable door jam.. I routered the teak to give it a soft edge for when I bang my head into it.   Nice board ready to install. Setting the Teak upper. I drilled holes in the back of the teak plate to match the mast step through bolts.  I did not remove the mast step and put extended bolts on.  I wanted a smoot