Posts

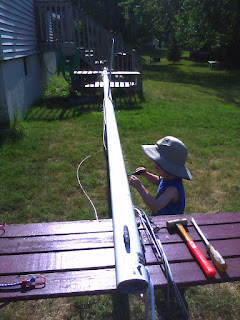
Teak, Bronze, and Anti-Skid

Image
Rub Rails Sand, sand & sand some more.  This has been the summer of sandpaper for me.  The teak on this boat was in rough shape to say the least.  It had gone gray and the previous owner coated it with Watco teak oil obviously an attempt to pretty up the boat before selling.  So I stripped the teak with teak cleaner.  Then began sanding.  When I started this stuff was rough especially the rub rails.  I could easily see getting splinters in your foot as I walked around the deck or sat in the cockpit.   It took me a long time and a lot of deliberating on what to coat the teak with once I'd finished.  I was going to use Sikkens .   I've used Sikkens before however have not been overly thrilled with the products durability or mustardy color.  Yet all the web forums still say it is the best stuff out there.   While standing in the aisle at Wolfs   holding the can in my hand and looking around rather sad about the color choices one of Wolf's people came up and ask

Rigging, and bottom finish.

Image
Rigging projects.  What is that?  No.. no electrical tape is not the same as rigging tape.  Oh boy I think we will just make a new fore stay.   Boot Strip. I used  what was left of the top of my existing boot strip and projected down .  Similar to this video from sailing  Magazine.  My boot strip might be a bit wider that the original but I figure it is easier to paint the blue up a little higher than trying to apply red over the anti-fouling paint later.  Hopefully every thing will lay correctly we will see once it is in the water.   Bottom paint. With all of the reading I've done it seems their is a push to remove copper from bottom paints.   So I decided to take the leap and go with Pettit Paints Ultima Eco, Copper Free Dual-Biocide.  According to the guys at Wolfs Marine  it is a new product this year but the testing on it has been  shown  to have good results.  It took about half a gallon to put 3 coats on the bottom.  It looks pretty good.  Sittin

Stripping the bottom of a CD Typhoon

Image
At the start I think there may have been 35 years worth of paint on the bottom of this boat minus what had chipped off.   I knew this was going to be a big job at the beginning but thought maybe I'd get lucky and most of it would just power wash off and a lot did.  It ended up being a 3 stage process.  Power wash, Chemical Strip then ultimately grind/sand off  the remaining paint.  Stage 1.  Power washing let's see what we have here.  A good power wash also identified some problem areas around the rudder gudgeon, and shaft. That can't be good. Well there is still some fiber glass holding the rudder on. Inspector is up from his nap...  Dad things are not looking good here. Stage 2 Paint Stripper.   For this I used Back to Nature Ready Strip .  Found at your friendly West Marine.  The reviews on West's web site are pretty accurate.  The stripper is not a cure all but given time it takes off quite a bit.  I stripped t

Scrub a Dub Dub.... Wasps in a Typhoon.

Image
1st a good cleaning.   The boat was pretty messy but the inside was really bad.  Full of Mud Douber nests. Yeah these nasty little guys.  Luckily there weren't too many adults.  Basically, the entire boat was emptied out.  I went through and pulled down the nests and vacuumed them all out.  Then I pulled out the garden hose and sprayed out the entire boat stem to stern.  It's pretty tight getting in the back of the boat under the seats and spraying inside the fiberglass liners.   When we where kids we squeezed in and out of my Uncles Cape Dory Typhoon this way all winter long not a second thought.  ... I've grown some since then.   A Tight Fit. Cleaned out and Drying. Wasp nest free even in the bilge.

Initial Blog Post We Made it Home.

Image
Hi all.  We have purchased a new to us Cape Dory Typhoon.  It's a bit of a fixer upper. This is her straight from Illinois full of Mud Dobber nests and all.  Lucky thing my wife ( see stranger than fiction ) went into the hospital or I might have never found it.  Seems I'm always buying a boat while or right after she gets out of the hospital. A lot has happened since this picture and I hope to have time to start updating this blog soon.   Here are the basics. This is a 1978 Cape Dory Typhoon Weekender.  For all the specs and some history on the Typhoon you can check out this link .   It's late so I'll get working on more updates later.  .